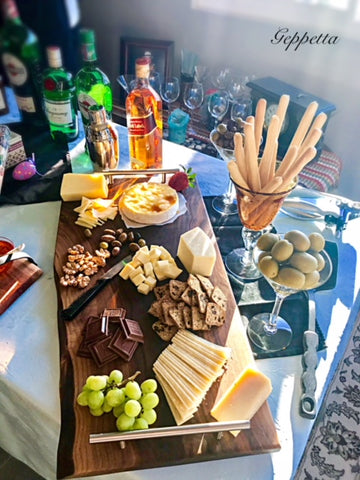
Instagram feeds are full of pictures of charcuterie boards overflowing with color and flavor. They’re so gorgeous that it’s easy to think they must be impossible to make, but nothing could be further from the truth. Charcuterie boards are actually a perfect way to entertain because they are so very social by nature—everyone will want to gather and linger around one. Plus, most boards require absolutely no cooking—the only skill required is buying some good ingredients (or raiding your fridge and pantry). A successful board has a nice range of cured and fresh flavors, as well as pickled, savory and sweet. Here are a few tips for building a beautiful and delicious board:
1. Start with a good board. The size of your board will determine how much you can fit on there. A large party calls for a large board—European-style Geppetta Boards can vary in size. If you don’t have one of my large boards, consider using several smaller ones clustered together. They don’t need to be at match, different sizes and wood colors add to the beauty of the display!
2. Think of the meat and cheese as the anchors for a good charcuterie board and start there. I like to have two to three blocks of cheese that offer a range of flavor and texture—some sort of soft, creamy cheese (like Brie or Taleggio) a harder, crumblier cheese (such as a sheep’s milk cheese like Manchego) and perhaps a tangy blue or goat’s milk cheese. I place these on the board first since they take up a fair amount of real estate. I follow up with laying out the cured meats, in and around the cheeses, which creates different shapes and spaces on the board that will be filled by other ingredients. Trader Joe’s offers a range of traditionally cured meats—prosciutto, Genoa salami, soppressata and pepperonis—that are absolutely delicious and come already sliced (bonus!). Of course if you want to support one of your local Italian delis that is always a great idea for fresher cuts of meat and unique flavors!
3. Next, I like to place a few small bowls on the board and fill them with anything juicy that needs to be contained—olives (don’t forget to have another bowl nearby for pits), sun-dried tomatoes or pickled peppers or onions. A dip can also be a nice addition—think ready-made hummus or bean dip doctored up with good olive oil and a showering of fresh herbs. A good pâté would fit in nicely, too.
4. Tuck in slices of baguette and a couple of crackers or types of flatbread. You can also add nuts, such as pistachios, toasted cashews, raw almonds and candied walnuts (don’t be afraid to include nuts in their shell and a nutcracker—a great conversation starter).
5. Now the fun really begins, as you fill in all the nooks and crannies of the board with colorful vegetables and fruits. Here, the sky’s the limit, but a good rule of thumb is to work with what’s in season…so in winter, reach for fennel, watermelon radishes, slices of kohlrabi, carrots, endive leaves, crisp apples, pomegranates and clementines. In summer, think of juicy cherry tomatoes, fresh berries, peppers, snap peas, and so much more. Dried fruits add a concentrated hit of sweetness and work well in any season. I add some form of chocolate to every charcuterie board… Dark chocolate, milk chocolate, white chocolate, chocolate covered espresso beans, or chocolate covered almonds. It never fails that it’s always gone at the end of the night!
Don’t forget to have plenty of small napkins ready, knives for slicing and spreading the cheeses and wooden picks for spearing all the goodies. Finally, snap a picture, if you like, post it to Instagram…and then send your beautiful creation out into the world to be devoured and destroyed by your hungry and thankful friends. Just as it should be.


Add a comment